
Setting up a Magento 2 development environment requires quite a bit of work. Back in the old days, we need to manually install LAMP stack on the computer and configure virtual hosting, update /etc/hosts and etc. That is just boring! Although nowadays, we have VM, Vagrant and Docker, the performance is still not very impressive comparing to the native setup. So here is what I found with Laravel Valet and it is really easy to have a local dev environment setup quickly. Now I am going to show you how to get a new Magento 2.2 set up quickly. Unfortunately Laravel Valet only works for Mac users. So if you are a Windows user, I have another post to walk through a local setup with Docker and NFS. So here we go.
Installing the stack
Valet requires PHP to be installed on the machine as Valet runs Nginx which hosts the local site. Magento requires MySQL database to be installed. So we need to install PHP and MySQL.
Installing PHP7.1 via Homebrew
Magento 2 supports PHP 7 but it supports some versions of PHP 7. Check the PHP version that is supported by Magento 2 first before you install them. You can find the supported versions here. The current version of Magento 2 at the time of writing is 2.2 and it supports 7.1.x. So let’s get PHP 7.1 installed. On Mac, here I use Homebrew, but you can use other package managers if you like. The new version of Homebrew has included PHP into its core repo so this makes it easy to install.
brew install php71
Once that is done. You want to make sure that when you type php in the console, it uses the newly installed PHP version since Mac has a default PHP version installed. To ensure it always uses this PHP version, you can add it to the $PATH.
echo 'export PATH="/usr/local/opt/php@7.1/bin:$PATH"' >> ~/.bash_profile
Installing MySQL5.7 via Homebrew
Although we can install MySQL 8, Magento 2 does not have official support for MySQL 8 yet. It might also work but we don’t want to go cutting edge. Here we will install MySQL 5.7. I also found Sequel Pro (V1.1.2, the latest version at the time of this writing) also has some issues with connecting to MySQL 8.
brew install mysql@5.7

brew services start mysql
Note: If there was a MySQL installed say MySQL 8 and you wan to downgrade to MySQL 5.x, in addition to “brew uninstall mysql“, you will have to clear the files from the directory /usr/local/var/mysql which store stores the actual database files. Otherwise, the newly installed database will complain about the database consistency when it boots up.
This should install the database with an empty root password. This allows you to connect using root without a password. To verify the database is ready.
ming_mbp:~ mingyan$ mysql -h 127.0.0.1 -uroot
Welcome to the MySQL monitor.  Commands end with ; or \g.
Your MySQL connection id is 3
Server version: 5.7.22 Homebrew

Copyright (c) 2000, 2013, Oracle and/or its affiliates. All rights reserved.

Oracle is a registered trademark of Oracle Corporation and/or its
affiliates. Other names may be trademarks of their respective
owners.

Type 'help;' or '\h' for help. Type '\c' to clear the current input statement.

mysql>
Installing Valet via Composer
For any modernPHP developments, Composer is a must have to manage dependencies. Although it is not perfect and sometimes it complains about some random issues. It is still the best package manager and makes dependency management and class autoloading so much easier. Remember the old days with PEAR?
Now we are good to install Valet. Make sure the “~/.composer/vendor/bin” directory is in your system’s “PATH”.
According to Valet docs, to install Valet with Composer,
composer <span class="token keyword">global</span> <span class="token keyword">require</span> laravel<span class="token operator">/</span>valet
It might work for you. However, it didn’t work for me personally. After a bit of googling, I found an alternative to install Valet,
composer global require consolidation/cgr
cgr laravel/valet
Cgr solved the package conflict that caused global require command to freak out. So use Cgr if that is your case as well. Here is the extraction from Cgr docs that explains it better.
The Composer global require command is a recommended installation technique for many PHP commandline tools; however, users who install tools in this way risk encountering installation failures caused by dependency conflicts between different projects. The cgr script behaves similarly to composer global require, using composer require to install a global-per-user copy of a commandline tool, but in an isolated location that will not experience dependency conflicts with other globally-installed tools.
Once the package is installed, we can install Valet by running
valet install
Once that is done. We are good to set up Valet to serve our site locally.
Create a new directory on your Mac by running something like mkdir ~/Sites. Next, cd ~/Sites and run valet park. This command will register your current working directory as a path that Valet should search for sites.
Next, create a new site within this directory, mkdir ~/Sites/magento22. Open http://magento22.test in your browser. The Nginx server should be able to serve the site. But because we have not installed Magento yet, it does not have any content to serve. To verify the hosting is work, we can have a dummy php file, like test.php with the content Just to verify Valet is working properly with PHP.
Since we are dealing with a e-commerce site, it is better we have HTTPS enabled so that it works better with checkout and admin which normally require HTTPS/TLS. Although we can disable HTTPS all together, it is still good to have that enabled. It is super easy with Valet, no more cert generations and virtual host configuration:) With Valet, just run this command:
valet secure laravel
This allows the site to be accessed via HTTPS so we can do https://magento22.test.
If you can see the PHP information printed on http://magent22.test/test.php, then the stack is good to run Magento. You can further customise the configuration. See here for more detail.
Installing Magento via Composer
There are a few ways to install Magento 2. You can install Magento by downloading the whole package including everything from https://magento.com/tech-resources/download It comes with everything including all libraries and packages in vendor directory. So you don’t need to run composer install. However, this tar ball file does not have .gitignore file which is used to exclude third party libraries from the version control system such as Github and Bitbucket. If you go this way and want to check the project into Git. It’s better you manually add the .gitignore file from here. That way, you keep your Git repo clean and minimal.
According to the official recommendation, we install Magento via composer command: composer create-project. Here is the complete command:
composer create-project --ignore-platform-reqs --repository-url=<a href="https://repo">https://repo</a>.<a href="http://magento.com/">magento.com/</a> magento/project-community-edition magento22
The command just asks the package magento/project-community-edition from the specified repository on https://repo.magento.com/ to be installed in the directory magento22. I name it Magento22 as I am installing a Magento 2.2 in this case. You can name it anything you like. Once that is done, all the files needed have been pulled down from the repository.
Before we kick off the installation process, we have to increase the memory limit. Since Magento is a resource hungry beast, it requires a lot of memory and CPU to run. That is also the case with the installation process. So we need to increase the PHP memory limit. Update file at /usr/local/etc/php/7.1/conf.d/php-memory-limits.ini and change the directive memory_limit to 1024M from the default 128M. We can verify the configuration update by running php -i | grep memory_limit and check the memory limit has been increased to 1024M.
We need to create an empty database for Magento installation so the installation process will populate this database.
ming_mbp:~ mingyan$ mysql -h 127.0.0.1 -uroot Welcome to the MySQL monitor. Commands end with ; or \g. Your MySQL connection id is 4 Server version: 5.7.22 Homebrew Copyright (c) 2000, 2013, Oracle and/or its affiliates. All rights reserved. <span id="mce_SELREST_start" style="overflow:hidden;line-height:0;"></span> Oracle is a registered trademark of Oracle Corporation and/or its affiliates. Other names may be trademarks of their respective owners. Type 'help;' or '\h' for help. Type '\c' to clear the current input statement. mysql> create database magento22;
Now we are good to proceed with the actual installation which will create the database tables and populate the database with minimal data. To do that, navigate to the magento root directory eg, ~/Site/magento22 and run the Magento CLI which comes with Magento 2:
bin/magento setup:install --admin-firstname=Ming --admin-lastname=Yan --admin-email=ming.yan@magento22.test --admin-user=admin --admin-password='test123' --base-url='https://magento22.test' --base-url-secure='https://magento22.test' --db-user='root' --db-host='127.0.0.1' --db-name='magento22' --backend-frontname=admin --use-rewrites=1
All options are pretty much self explanatory basically we specify the first admin user, database connection detail(the database “magento22” we just created) and URLs for frontend and backend admin. Please note that we add –use-rewrites=1 to ask Magento not to add index.php in the front of all URL path as we want to turn on URL rewrite to have “pretty” URLs.
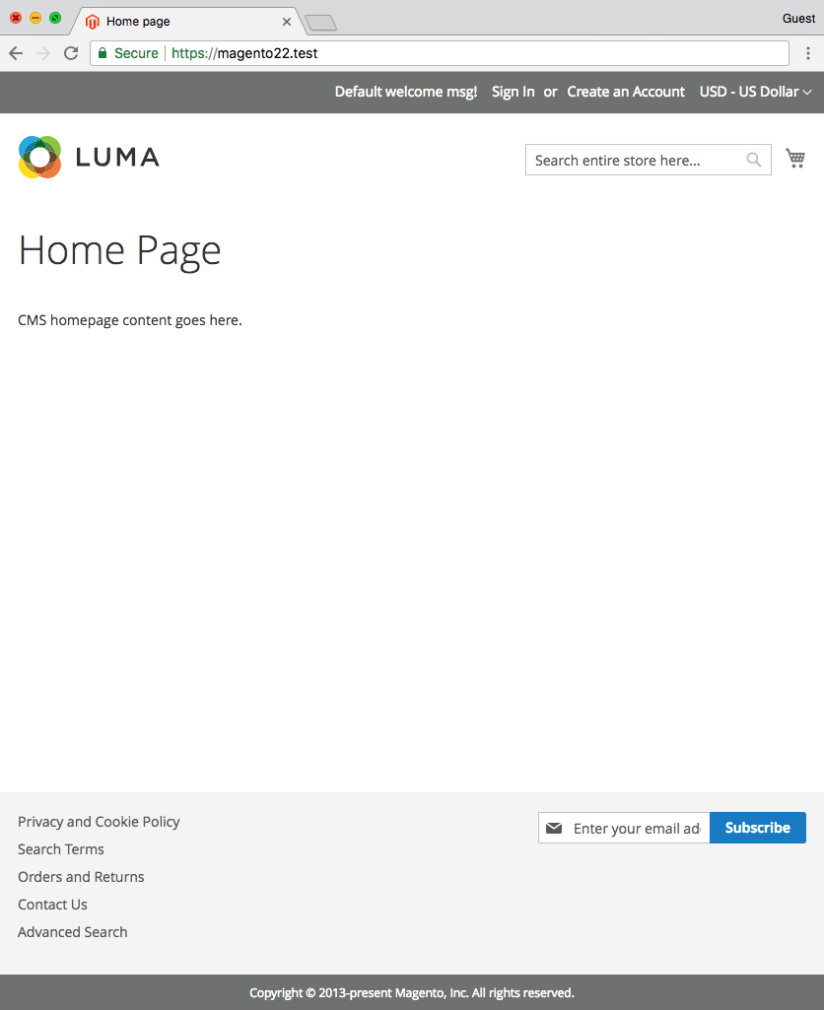
IMPORTANT: the option –base-url=’https://magento22.test’ Since we have have valet secure command enabled, which auto redirects all requests from HTTP to HTTPS on our local server. This base url needs to be set to begin with https because by default Magento initial set up use HTTP for admin access which will cause the infinite redirect loop between HTTP and HTTPS when you try to access /admin
It will take a while for it to install the database, go through all default modules and generate related files. Once that is done, you can visit the local site https://magento22.test. You should see a pretty empty site.
Deploy Magento sample data (Optional)
Sometimes we need to have a functional site with some sorts of products and content that we can use to test our work, eg, module and theme development. It is handy that Magento 2 comes with a default sample dataset. The sample data is packaged as extra modules so we need to install these modules. Magento 2 has a CLI command for this. It requires the public key and private key for your Magento login. You can find out the key pairs in your Magento account detail page.
ming_mbp:magento22 mingyan$ bin/magento sampledata:deploy
./composer.json has been updated
Loading composer repositories with package information

Authentication required (repo.magento.com):
Username: [YOUR MAGENTO PUBLIC KEY]
Password: [YOUR MAGENTO PRIVATE KEY]
Do you want to store credentials for repo.magento.com in /Users/mingyan/Sites/magento22/var/composer_home/auth.json ? [Yn] y
Updating dependencies (including require-dev)
 This will pull down extra modules for the sample data. Once that is done, you will need to run the Magento CLI command setup:upgrade to install these modules. If everything goes well, after the process finishes, we should be able to see this.

So there we go. We have our little local shop set up running Magento 2.2 with PHP 7 and MySQL 5.7 on Nginx powered by Valet.
Thoughts
Valet can share sties to allow external access through ngrok.io but it does not support sites with valet secure. So if the site is not secured by valet secure command. This is actually a pretty handy way to run demos on the local computer with external users.
This whole set up is pretty straight forward and the performance is pretty good. Pages load fast and console commands run quickly. Compared to virtualisation solutions, it performs better. It is quite reliable for development.
Magento 2 EE (now called Magento Commerce) might need extra service components such as Redis, Memcached, Elasticsearch, split databases and RabbitMQ. These extra components can be installed individually on the local machine or replaced with a local alternative, eg database for search, local file system for Redis session and etc, or just use virtualisation by using docker containers for these services. After all the idea here is to run a high performance core Magento setup for development purposes. And I think this set up is GOOD.
